- Published on
[번역] Relay - Graphql Connections & Pagination
- Authors

- Name
- Kim, Dong-Wook
GraphQL Connections & Pagination
이번 섹션에서는, 페이지 목록 및 무한 스크롤을 포함하여 여러 항목의 컬렉션을 처리하는 방법에 대해 알아볼 것 입니다. Relay에서, Connection이라 알려진 추상화된 방법을 사용해서 페이지 목록과 무한 스크롤을 구현합니다.
Relay는 페이지네이션된 아이템 목록을 다루기 위해서 다양한 작업을 합니다. 하지만 해당 작업을 하기 위해서, schema에서 특정한 컨벤션을 따라야 합니다. 이 컨벤션은 강력하고 유연하며, 아이템 목록을 다루는 많은 제품들을 만들면서 나온 경험을 바탕으로 만들어졌습니다.
이해하기 위해서 3가지의 중요한 개념을 알아야 합니다.
- Edge들은 그 자체만으로 Property을 가지고 있습니다 - 예를 들면, 친구들의 목록에서, 어떤 사람과 친구가 되었을 때의 날짜는 당신과 edge 사이에 Property이 됩니다. 우리는 edge들을 표현하는 node들을 만듬으로써, 이것들을 다루고 있습니다.
- list 그 자체도 Property을 가지고 있습니다. 예를 들면 다음 페이지가 있는지 없는지 같은 것들 입니다. 현재 페이지 뿐만 아니라 리스트 그 자체를 표현하는 node를 통해 이것들을 다루고 있습니다.
- Pagination은 cursor를 통해 작동합니다 - 해당 심볼은 다음 페이지를 가르키는 불투명한 값입니다(offset이 아닙니다)
만약 유저의 친구들 목록을 보여주고 싶다고 가정해봅시다. 아래 사진과 같은 모습으로 생각해볼 수 있을 것입니다.
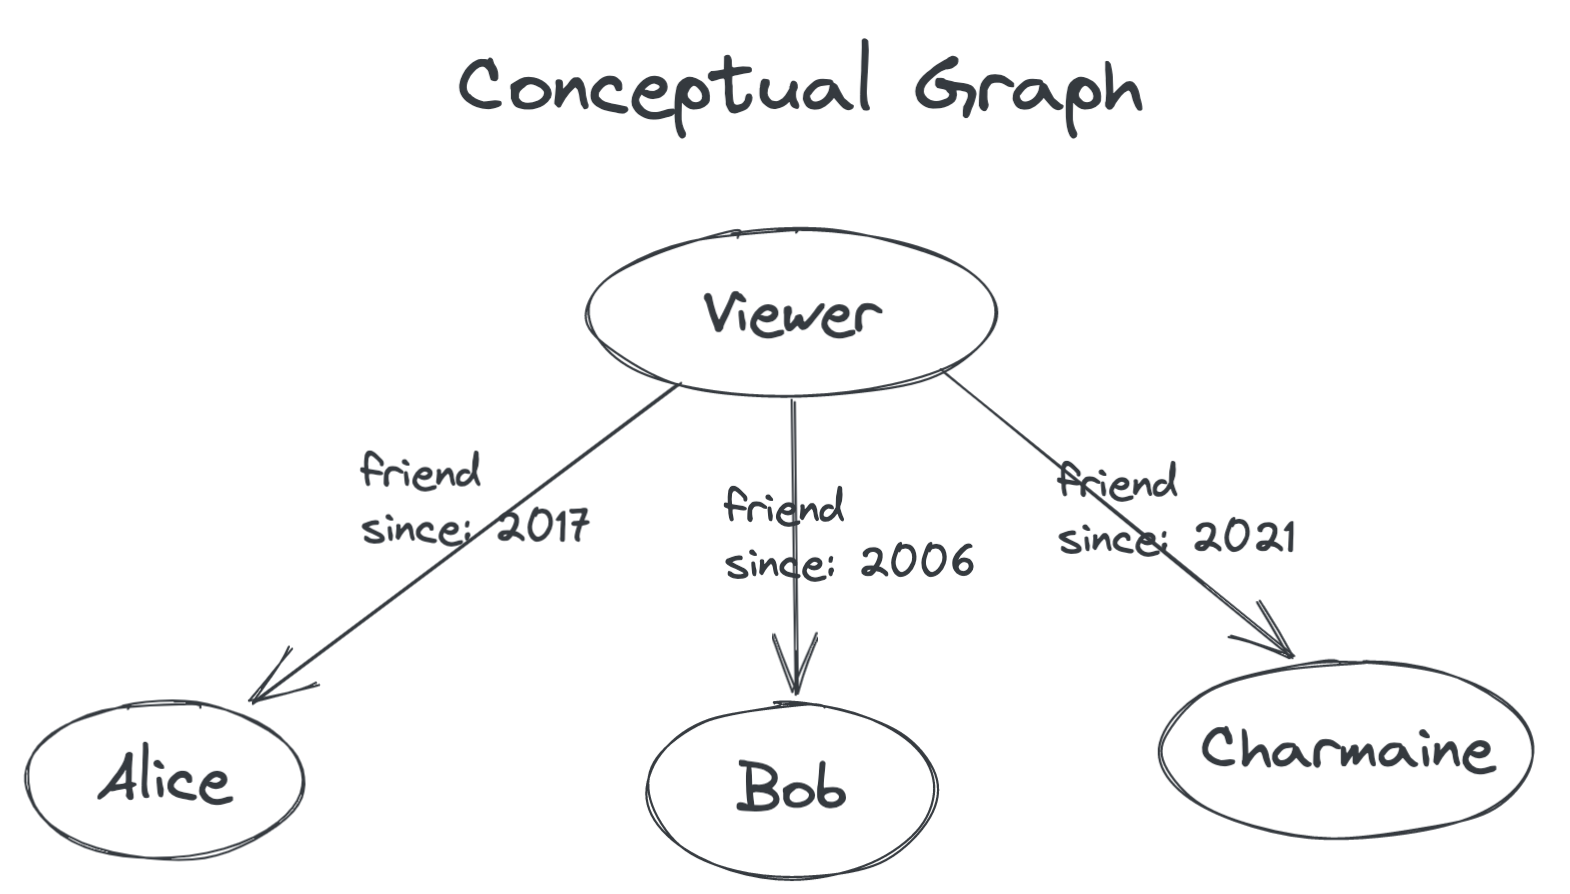
GraphQL로 해당 상황을 모델링 해봅시다
Graphql에서, Edge가 아닌 노드들만 Property을 가질 수 있습니다. 그래서 아래와 같이 개념적인 edge들을 표현할 것 입니다.
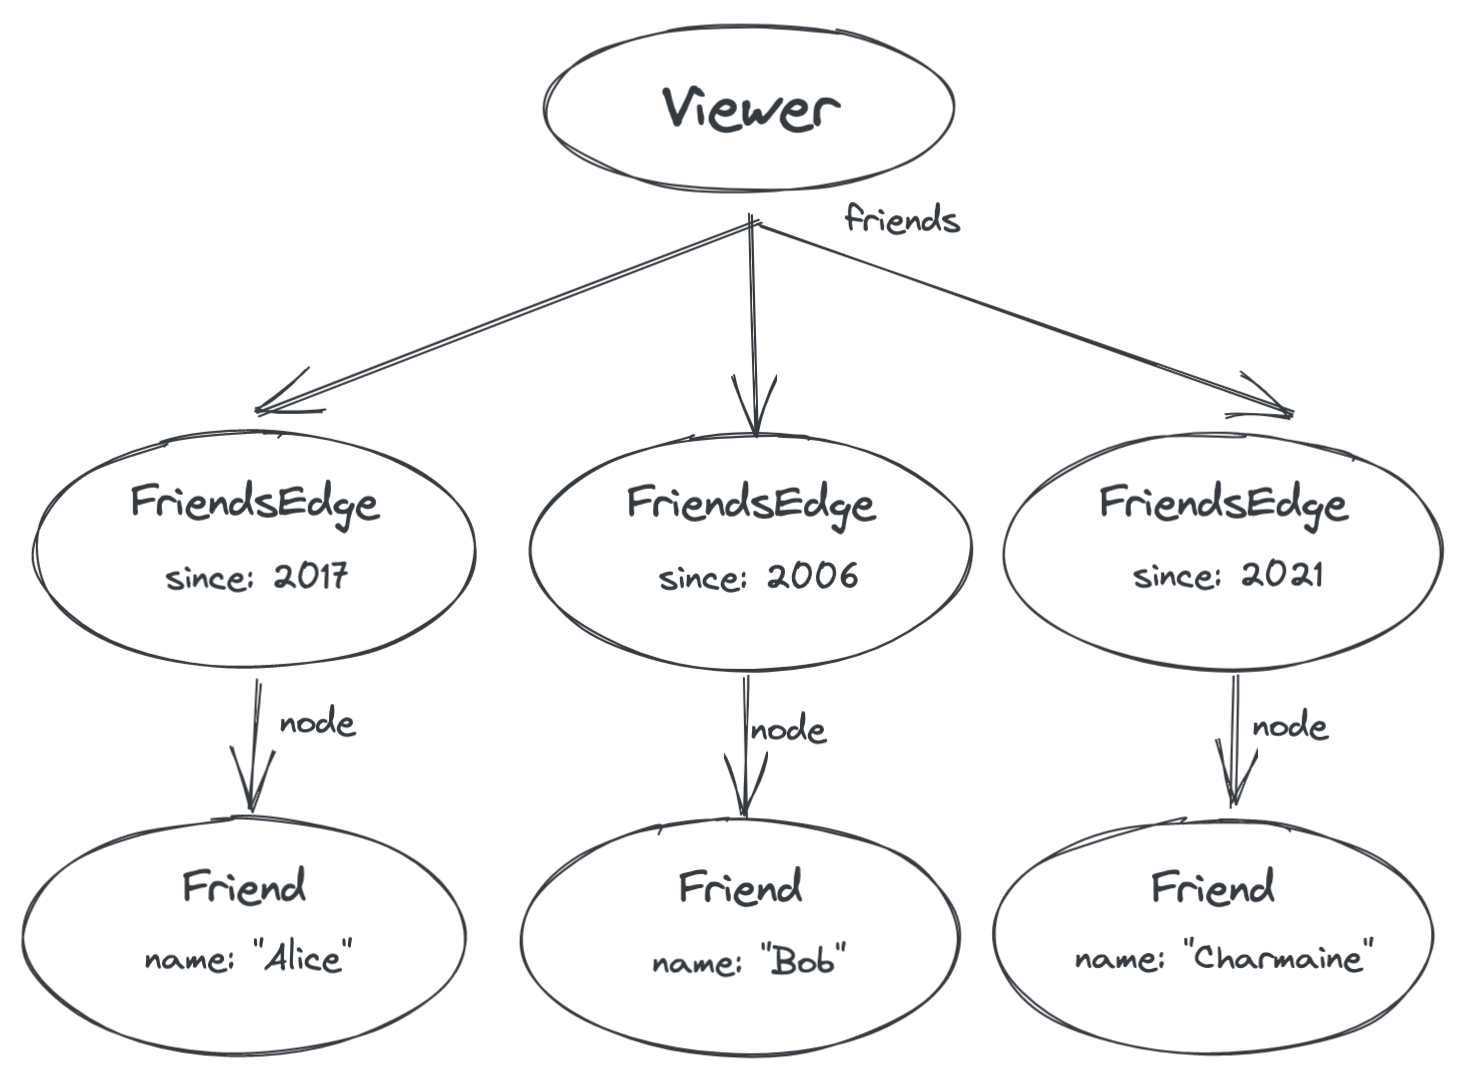
이제 edge들의 propertyemfdms "FriendsEdge"라고 불리는 새로운 타입의 노드로 표현됩니다
GraphQL을 통한 query는 아래와 같은 형태로 표현될 것 입니다.
// XXX example only, not final code
fragment FriendsFragment1 on Viewer {
  friends {
    since // a property of the edge
    node {
      name // a property of the friend itself
    }
  }
}
이제, GraphQL 스키마에서 Edge가 생성된 날짜와 같은 특정 정보를 넣을 수 있습니다.
이제, 우리의 schema에서 pagination과 무한 스크롤을 지원하기 위해서 무엇을 모델링 해야할지 생각해봅시다
- 클라이언트는 원하는 page의 사이즈를 명시할 수 있어야합니다.
- 클라이언트는 더 남은 페이지가 있는지 알 수 있어야합니다.
- 클라이언트는 한 번 페이지를 요청한 이후에도 다음 페이지를 요청할 수 있어야합니다.
GraphQL에서 어떻게 해당 기능을 구현할 수 있을까요? field argument를 통해 페이지 크기를 명시할 수 있습니다.
서버가 다음 페이지가 있는지 없는지 알려줄 수 있도록 하기 위해서, 친구 목록 그 자체에 대해서 알고 있는 graph 안에 node를 도입해야합니다. 이 새로운 node를 Connection이라고 부릅니다
Connection node는 당신과 당신 친구들 사이에 연결관계를 나타냅니다. Connection에 대한 메타데이터는 그곳에 저장되어 있습니다. 예를 들면, totalCount 필드에는 얼마나 많은 친구들이 있는지 알려줍니다. 게다가, 현재 페이지를 나타내는 두 필드가 있습니다: pageInfo 필드는 현재 페이지에 대한 메타데이터를 가지고 있습니다. 그리고 edges 필드는 이전에 봤던 edge들의 지점에 대한 정보를 가지고 있습니다.
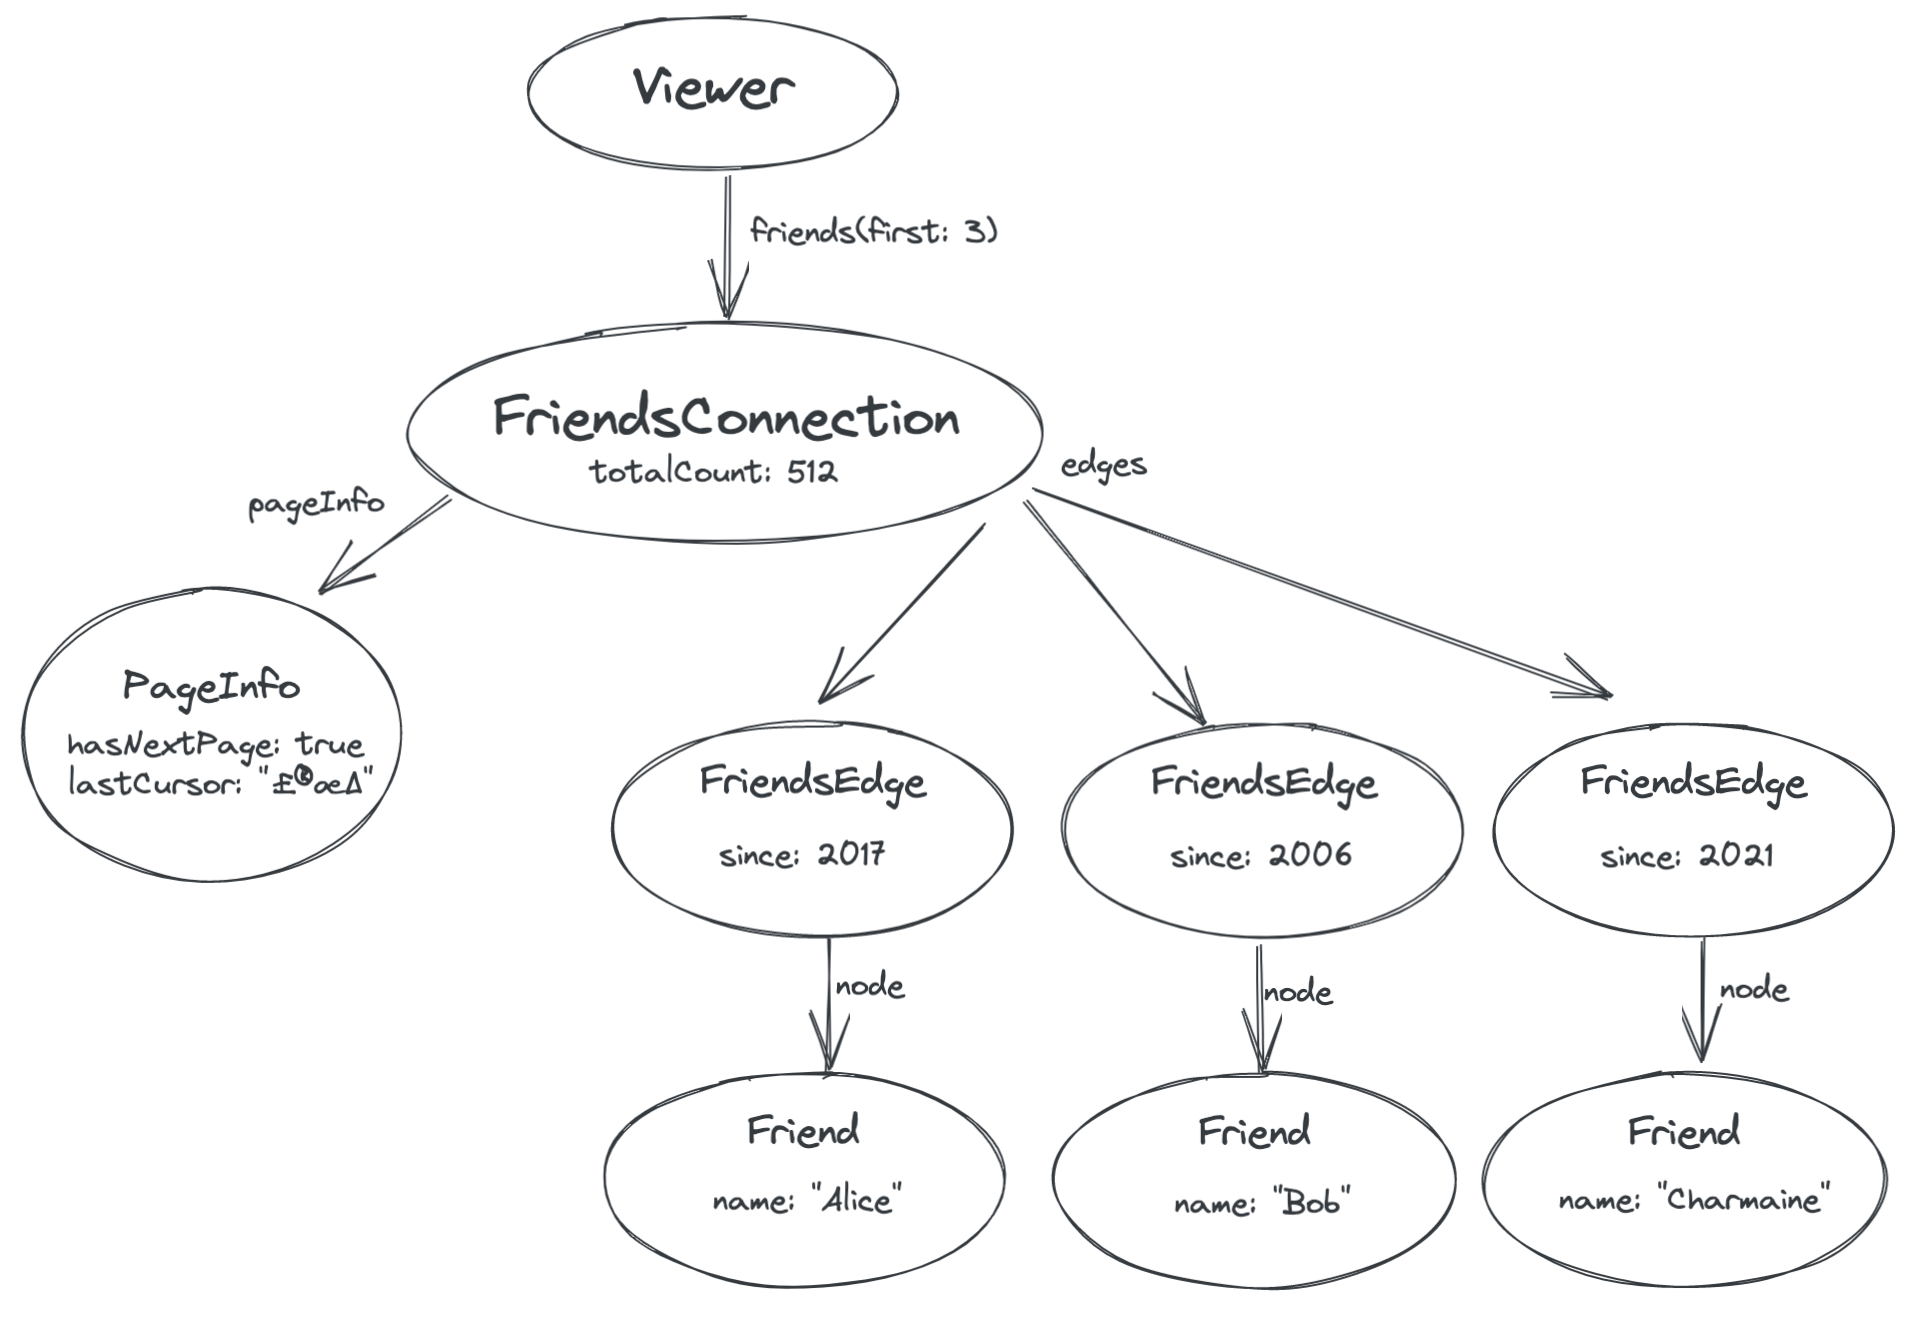
마침내, 우리는 다음 페이지에 대한 결과를 요청할 방법이 필요합니다. 위 다이어그램을 보면, PageInfo 노드에 lastCursor라고 불리는 필드가 있음을 확인할 수 있습니다. 이것은 마지막으로 주어진 edge에 대한 위치를 표현해주는 토큰입니다. 우리는 해당 커서를 서버에 전달하고, 서버는 해당 커서 이후의 친구 목록을 반환해줍니다.
lastCursor를 넘겨줌으로써, 서버는 어떤 친구 목록을 반환해야할지 알 수 있습니다.
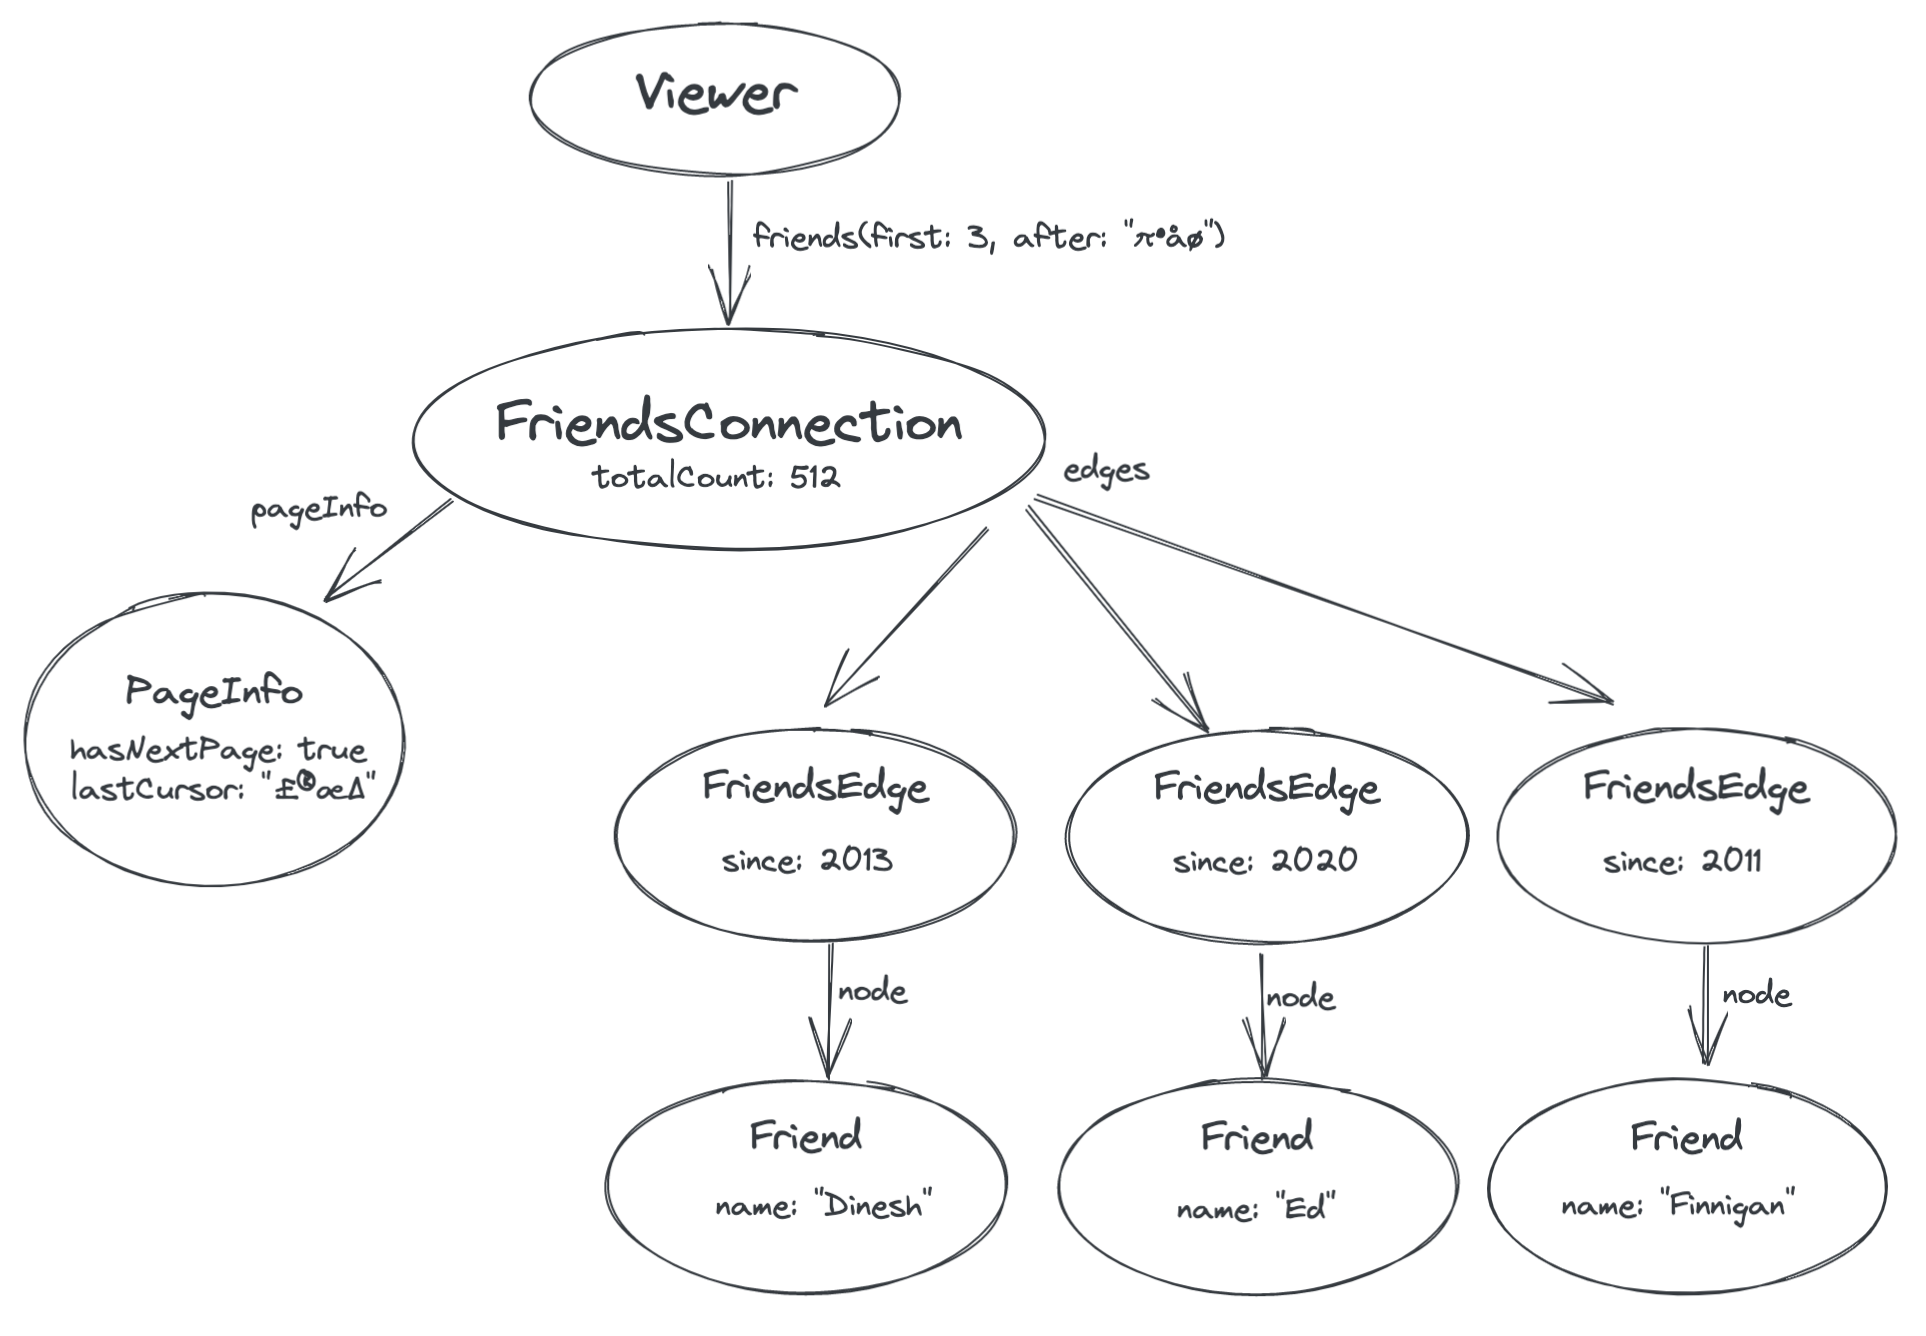
GraphQL Cursor Connections Spec파일에 paginated list를 위한 schema 모델링 방법에 대한 자세한 내용이 있습니다. 이 방법은 다양한 어플리케이션에서 유연하게 작동합니다, 그리고 Relay가 해당 컨벤션을 이용해서 pagination을 구현하지만, Relay를 사용하지 않더라도 해당 컨벤션을 사용할 수 있습니다.
이제 Connection을 위한 기저에 깔린 모델링을 알아봤으니, 이제 뉴스 피드 스토리 목록을 구현해봅시다.
"Load More Comments" 기능 구현
Story 컴포넌트를 다시 한 번 봅시다. Story 컴포넌트 아래에 StoryCommentsSection 컴포넌트가 있습니다
import StoryCommentsSection from './StoryCommentsSection'

function Story({ story }) {
  const data = useFragment(StoryFragment, story)
  return (
    <Card>
      <Heading>{data.title}</Heading>
      <PosterByline person={data.poster} />
      <Timestamp time={data.posted_at} />
      <Image image={data.image} />
      <StorySummary summary={data.summary} />
      <StoryCommentsSection story={data} />
    </Card>
  )
}
그리고 StoryCommentsSection의 fragment를 Story의 fragment에 추가합니다.
const StoryFragment = graphql`
  fragment StoryFragment on Story {
    // ... as before
    ...StoryCommentsSectionFragment
  }
`
이제 각 스토리에 3개의 댓글을 확인할 수 있을 것 입니다. 몇몇 스토리들은 3개 이상의 댓글을 가지고 있고, 그렇다면 "Load more" 버튼이 보여질 것 입니다.
이제 StoryCommentsSection으로 가서 한 번 봅시다
const StoryCommentsSectionFragment = graphql`
  fragment StoryCommentsSectionFragment on Story {
    comments(first: 3) {
      edges {
        node {
          ...CommentFragment
        }
      }
      pageInfo {
        hasNextPage
      }
    }
  }
`

function StoryCommentsSection({ story }) {
  const data = useFragment(StoryCommentsSectionFragment, story)
  const onLoadMore = () => {
    /* TODO */
  }
  return (
    <>
      {data.comments.edges.map((commentEdge) => (
        <Comment comment={commentEdge.node} />
      ))}
      {data.comments.pageInfo.hasNextPage && <LoadMoreCommentsButton onClick={onLoadMore} />}
    </>
  )
}
StoryCommentsSection에서 첫번째 3개의 댓글을 가져옵니다. comments 필드는 page size를 인자로 받으며, 각각의 comment에 대해 edge 필드가 있으며, edge 필드는 comment data를 가지고 있는 node 필드를 가지고 있습니다. 개별적인 comment들에서 데이터를 가져오기 위해 CommentFragment를 spead해줬습니다. 그리고 connection의 pageInfo 필드를 사용해서 "Load More" 버튼을 보여줄지 결정합니다.
이제 "Loade More" 버튼을 눌렀을 때 어떻게 동작할지 구현해봅시다.
Augmenting the Fragment
컴포넌트를 수정하기 전에, fragment는 3개의 extra information이 필요합니다. 첫번째로, 하드 코딩된 인자가 아닌 page size와 cursor 인자를 받을 수 있는 fragment가 필요합니다
const StoryCommentsSectionFragment = graphql`
  fragment StoryCommentsSectionFragment on Story
  @argumentDefinitions(cursor: { type: "String" }, count: { type: "Int", defaultValue: 3 }) {
    comments(after: $cursor, first: $count) {
      edges {
        node {
          ...CommentFragment
        }
      }
      pageInfo {
        hasNextPage
      }
    }
  }
`
다음으로, fragment가 refetch가 가능하도록 만들어야합니다. 그래서 Relay가 인자에 맞는 새로운 값을 불러올 수 있도록 해야합니다.
- 즉 $cursor 인자를 받도록 해야합니다.
const StoryCommentsSectionFragment = graphql`
  fragment StoryCommentsSectionFragment on Story
    @refetchable(queryName: "StoryCommentsSectionPaginationQuery")
    @argumentDefinitions(
    ... as before
`
그리고 마지막으로 Relay는 fragment 안에 어떤 field가 Connection인지 표현해줘야합니다. 이를 위해 @connection 지시어를 사용합니다.
const StoryCommentsSectionFragment = graphql`
  fragment StoryCommentsSectionFragment on Story
  @refetchable(queryName: "StoryCommentsSectionPaginationQuery")
  @argumentDefinitions(cursor: { type: "String" }, count: { type: "Int", defaultValue: 3 }) {
    comments(after: $cursor, first: $count)
      @connection(key: "StoryCommentsSectionFragment_comments") {
      edges {
        node {
          ...CommentFragment
        }
      }
      pageInfo {
        hasNextPage
      }
    }
  }
`
@connection 지시어는 unique 문자여야하는 key 인자를 받습니다. 이 key는 mutation을 하는 동안에 connection의 컨텐츠를 수정할때 사용됩니다.
The usePaginationFragment Hook
이제 fragment를 완성했으니, Load More 버튼을 사용하도록 컴포넌트를 수정해봅시다.
StoryCommentsSection 컴포넌트 상단에 아래 두 줄의 코드를 추가합니다.
const data = useFragment(StoryCommentsSectionFragment, story)
const onLoadMore = () => {
  /* TODO */
}
그리고 아래와 같이 수정합니다.
const { data, loadNext } = usePaginationFragment(StoryCommentsSectionFragment, story)
const onLoadMore = () => loadNext(3)
이제 "Load More" 버튼을 눌렀을 때, Relay는 새로운 데이터를 불러오고, 컴포넌트를 업데이트합니다.
useTransition Hook을 사용해서 로딩 과정 개선하기
Load More 버튼을 클릭하면, 새로운 댓글이 보여지기 전까지 어떠한 유저 피드백도 발생하지 않습니다. 모든 유저 엑션에 대해서 즉각적인 피드백이 있어야하기 때문에, 데이터를 로딩하는 동안에 스피너를 보여줍시다. 하지만 존재하는 UI는 숨기지 않는 방식으로 스피너를 보여줍시다.
function StoryCommentsSection({ story }) {
  const [isPending, startTransition] = useTransition()
  const { data, loadNext } = usePaginationFragment(StoryCommentsSectionFragment, story)
  const onLoadMore = () =>
    startTransition(() => {
      loadNext(3)
    })
  return (
    <>
      {data.comments.edges.map((commentEdge) => (
        <Comment comment={commentEdge.node} />
      ))}
      {data.comments.pageInfo.hasNextPage && (
        <LoadMoreCommentsButton onClick={onLoadMore} disabled={isPending} />
      )}
      {isPending && <CommentsLoadingSpinner />}
    </>
  )
}
즉각적인 결과를 불러오지 않는 유저 엑션은 React transition으로 감싸져야합니다. 이를 통해 React는 여러 업데이트들에 대해서 우선순위화를 할 수 있습니다. 예를 들면, 만약 데이터가 사용가능해졌을때 React는 새로운 댓글들을 렌더링할 것 입니다. 그리고 유저는 다른 페이지로 넘어가기 위해 다른 탭을 클릭했습니다. 이때 React는 새로운 댓글을 렌더링하지 않고, 페이지를 이동할 것 입니다.
Infinite Scrolling Newsfeed Stories
뉴스피드는 댓글을 더 불러오는 것과 비슷합니다. 하지만 loadNext 함수가 유저의 스크롤에 따라 자동적으로 호출된다는 점에서 다릅니다.
Step 1 - Query에서 Connection 필드 선택하기
현재 앱에서는 상단에 3개의 스토리를 불러오기 위해서, topStories의 루트 필드를 사용합니다. Schema 또한 Viewer에서 newfeedStories 필드를 제공합니다(해당 필드는 Connection 입니다). Newsfeed 컴포넌트를 수정해서 새로운 필드를 사용할 수 있도록 해봅시다. Newsfeed.tsx를 다시 한 번 봅시다. GraphQL 쿼리는 다음과 같습니다.
const NewsfeedQuery = graphql`
  query NewsfeedQuery {
    topStories {
      id
      ...StoryFragment
    }
  }
`
해당 쿼리를 아래와 같이 바꿔봅시다
const NewsfeedQuery = graphql`
  query NewsfeedQuery {
    viewer {
      newsfeedStories(first: 3) {
        edges {
          node {
            id
            ...StoryFragment
          }
        }
      }
    }
  }
`
여기서 우리는 topStories를 viewer의 newsfeedStories로 교체했습니다. 그리고 처음 3개의 스토리를 불러오도록 first라는 이름의 인자를 추가했습니다. 그 안에서 우리는 edge를 선택하고 또한 node를 선택했습니다. 그리고 이전과 같이 그 안에서 StoryFragment를 spread 했습니다. 그리고 id를 선택함으로써 React의 key로 사용할 수 있도록 했습니다.
Step 2 - Map over the Edges of the Connection
Newsfeed 컴포넌트를 수정해서 edge들의 node들을 각각 렌더링하도록 했습니다.
function Newsfeed() {
  const data = useLazyLoadQuery(NewsfeedFragment, {})
  const storyEdges = data.viewer.newsfeedStories.edges
  return (
    <>
      {storyEdges.map((storyEdge) => (
        <Story key={storyEdge.node.id} story={storyEdge.node} />
      ))}
    </>
  )
}
Step 3 - Lower Newsfeed into a Fragment
Relay의 pagination 기능은 query 전체에 대해서 작동하지 않고, fragment들에 대해서만 작동합니다. 왜냐하면, 우리는 간단한 예제 앱에서 쿼리를 하나만 사용하지만, 실제 어플리케이션에서는 query는 고수준의 라우팅 컴포넌트에서 발행되기 때문입니다(그리고 paginate된 리스트를 보여주는 컴포넌트는 거의 같은 컴포넌트가 아닙니다).
이런 부분들이 작동하도록 하기 위해서, NewsfeedQuery를 fragment로 나눴습니다. 그리고 해당 fragment는 NewsfeedContentsFragment 입니다.
const NewsfeedQuery = graphql`
  query NewsfeedQuery {
    ...NewsfeedContentsFragment
  }
`

const NewsfeedContentsFragment = graphql`
  fragment NewsfeedContentsFragment on Query {
    viewer {
      newsfeedStories {
        edges {
          node {
            id
            ...StoryFragment
          }
        }
      }
    }
  }
`
그리고 모든 GraphQL schema는 가장 고수준의 필드의 타입을 나타내는 Query 타입을 가지고 있습니다. fragment를 on Query로 정의함으로써, 최상단의 Query에 대한 fragment를 정의할 수 있습니다.
Newsfeed 안에서는, useLazyLoadQuery와 useFragment 모두 호출했습니다. 하지만 실 어플리케이션에서는 보통 두 Hook은 다른 컴포넌트에서 호출됩니다.
export default function Newsfeed() {
  const queryData = useLazyLoadQuery(NewsfeedFragment, {});
  const data = useFragment(NewsfeedContentsFragment, queryData);
  const storyEdges = data.newsfeedStories.edges;
  ...
}
Step 4 - Augment the Fragment for Pagination
이제 우리는 스토리를 위해서 Connection field를 사용하고 있고, 또한 fragment들로 만들었습니다. 이제 Pagination을 지원하도록 수정해봅시다. 마지막 예시와 똑같이 생각하면 됩니다. 우리는 다음과 같은 것을 해야합니다
- page 사이즈와 cursor에 대해서 fragment 인자 추가하기(first와 after)
- 위의 인자들을 field 인자로써 newsfeedStories 필드에 넣어주기
- fragment를 @refetchable로 표시하기
- newsfeedStories 필드는 @connection이라 표시하기
그러면 아래와 같은 형태가 될 것 입니다.
const NewsfeedContentsFragment = graphql`
  fragment NewsfeedContentsFragment on Query
  @argumentDefinitions(cursor: { type: "String" }, count: { type: "Int", defaultValue: 3 })
  @refetchable(queryName: "NewsfeedContentsRefetchQuery") {
    viewer {
      newsfeedStories(after: $cursor, first: $count)
        @connection(key: "NewsfeedContentsFragment_newsfeedStories") {
        edges {
          node {
            id
            ...StoryFragment
          }
        }
      }
    }
  }
`
Step 5 - usePaginationFragment 호출하기
이제 NewsfeedContent 컴포넌트에서 usePaginationFragment를 호출하도록 만듭니다
function NewsfeedContents({ viewer }) {
  const { data, loadNext } = usePaginationFragment(NewsfeedFragment, viewer)
  const storyEdges = data.newsfeedStories.edges
  return (
    <>
      {storyEdges.map((storyEdge) => (
        <Story key={storyEdge.node.id} story={storyEdge.node} />
      ))}
    </>
  )
}
Step 6 - Scroll Trigger를 이용해서 Paginate 하기
InfiniteScrollTrigger라는 컴포넌트를 제공하고 있습니다. 해당 컴포넌트는 스크롤이 끝에 도달했을 때, 콜백을 호출합니다. 그리고 우리는 이때 loadNext를 호출할 것 입니다. 그렇게 하기 위해서는, 다음 페이지가 있는지 알아야하며, usePaginationFragment로 부터 반환된 값으로 판단할 수 있습니다.
function NewsfeedContents({ query }) {
  const { data, loadNext, hasNext, isLoadingNext } = usePaginationFragment(
    NewsfeedContentsFragment,
    query
  )
  function onEndReached() {
    loadNext(3)
  }
  const storyEdges = data.viewer.newsfeedStories.edges
  return (
    <>
      {storyEdges.map((storyEdge) => (
        <Story key={storyEdge.node.id} story={storyEdge.node} />
      ))}
      <InfiniteScrollTrigger
        onEndReached={onEndReached}
        hasNext={hasNext}
        isLoadingNext={isLoadingNext}
      />
    </>
  )
}
이제 실제 뉴스피드 앱처럼 동작하는 것을 볼 수 있습니다.
요약
- Connection은 paginate 할 수 있는 목록들에 대한 Relay가 사용하는 schema 컨벤션입니다.
- 단순한 리스트를 사용하는 것 보다 schema 안에서 Connection을 사용하는 것이 더 좋습니다. 필요할 때만 paginate 할 수 있기 때문입니다.
다음으로, 서버의 데이터를 어떻게 업데이트 하는지 알아보겠습니다. 어떻게 기존 Connection에 새로운 노드를 추가할 수 있는지 알아볼 것 입니다.